
ELBv2 DR-Mode GUIDE
Overview
Open Telekom Cloud (OTC) Release 3.1 provides a completely new "Elastic LoadBalancer Version 2" (ELBv2) which includes a lot of new features (see comparison table) and provides better performance. It was activated for the public OTC production environment (eu-de) in early September 2018.
ELBv2 uses the standard OpenStack LBaaSv2 APIs and is thus API-compatible with the Universal Load Balancer (ULB). It offers a superset of the ULB features and replaces ULB. It will gain additional features in the near future and will at some point (in 2019) also fully replace the old classic ELBv1.
Currently, ELBv2 does not support the Direct-Routing (DR) Mode listener feature from ULB natively; instead a ULB instance is used under the hood for load-balancers with such listeners. New loadbalancers with DR mode listeners can only be created via the API, no longer via the Web-Interface (Web-GUI).
We are working with our customers to determine whether the best medium-term plan is to migrate to other LB listener modes or whether a native implementation of DR-mode in ELBv2 is needed. The transparent use of ULB will remain in place until we have implemented a final solution.
| Function | Classic LB (ELB v1) | Unified Load Balancer | Enhanced LB (ELB v2) |
|---|---|---|---|
| Public and private network load balancing | (Private only added later and incomplete) | Supported | Supported |
| Forwarding based on domain name and URL | Not supported | Not supported | Supported |
| Access control (whitelist) | Not supported | Not supported | Supported |
| LB algo (round robin, least connections, source IP hash) | Supported | Supported | Supported |
| Weight assigned for ECSs | Not supported | Not supported | Supported |
| ECSs as backend servers | Supported | Supported | Supported |
| BMSs as backend servers | Not supported | Not supported | Supported |
| Standard OpenStack APIs | Not supported | Supported | Supported |
| Sticky session | Supported | Supported | Supported |
| WebSocket protocol | Supported | Not supported | Supported |
| Load balancing at L3 (IP proto w/ DR mode) | Not supported | Supported | Supported via ULB transparently created via LBaaSv2 API |
| UDP | Supported (not for private network LBs) | UDP not supported | Supported |
| SSL protocol and SSL encryption algorithms [*] | Supported | Not supported | Planned in Dec 2018 |
| SNI for certificates | Supported | Not supported | Planned in Dec 2018 |
| OBS storage for access log | Supported | Not supported | LTS(OTC 4.0) |
[*] SSL (Termination) Listener: Same as HTTPS (Termination) Listener but without HTTP specific handling (e.g. sticky session based on cookies, HTTP healthcheck, etc.). Used for plain TCP based applications where the loadbalancer will take all the encryption handling.
Documentation of all the Load Balancer features is also available in our doc center.
All previous "Universal Load Balancers" (ULBs) (except load balancers with DR-Mode listeners) have been migrated to ELBv2.
All ULBs using DR-Mode listeners are still running in the ULB cluster, are still visible in the Web-UI and can be modified using the Web-UI.
Creation of new loadbalancers using DR-Mode listeners is no longer supported in the Web-UI but only via API. The next section of this document explains how to use the APIs to create such load balancers and listeners.
Creating DR-Mode Listeners via API
The (OpenStack) API call to create a DR-Mode Listener didn't change with the release of the ELBv2. So if you were using automation tools to create your load balancers, nothing will change for you.
Sidenote: In upstream OpenStack, LoadBalancer development is done in the Octavia project nowadays, allowing the implementation of enhanced modes and features, but also staying backwards compatible with LBaaSv2 APIs that originally were part of OpenStack's networking component neutron.
Here is an example REST payload to create a DR-Mode Listener:
{
   "listener": {
      "protocol": "TCP",
      "protocol_port": "0",
      "name": "DR-Mode-Listener",
      "loadbalancer_id": "${balanceid}",
      "admin_state_up": true
    }
}
Of course this can also be sent with the standard OpenStack client tools (python-neutronclient) which we bundle (along with a ~/.ostackrc config template) in most of our public Linux images.
Example code to create an ULB Loadbalancer with DR-Mode Listener via LBaaSv2 APIs in the same network as an existing ECS server defined in variable ECS\_NAME:
ECS_NAME=XXX
IP=$(openstack server list --name $ECS_NAME -f value -c Networks | cut -d = -f 2)
SUBNET=$(neutron port-list -f json -c fixed_ips | jq '.[] | .fixed_ips' | tr -d '\"\\\,' | sed -e s'/.$//' -e s'/^.//' | awk '/'$IP'$/{print $2}')
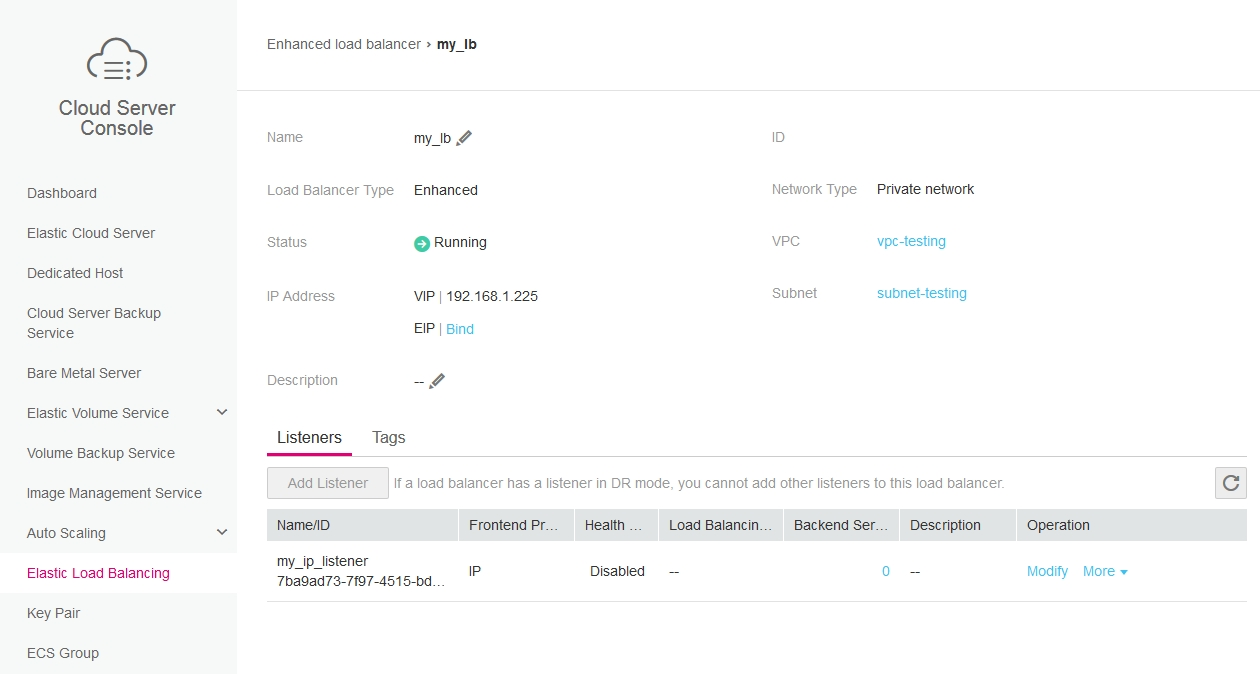
neutron lbaas-loadbalancer-create $SUBNET --name my_lb
LB_ID=$(neutron lbaas-loadbalancer-show --name my_lb -f value -c id)
neutron lbaas-listener-create --protocol TCP --protocol-port 0 --loadbalancer $LB_ID --name my_ip_listenerWe recommend using the OpenStack client tools (or higher-level automation tools like ansible, heat or terraform) in general. Nevertheless, we also show the raw REST requests that you can send via curl here to provide insight into the workings of the API.
Here's how the result of above call looks like in the Web-UI:
To support both old (ULB-)DR-Mode Listener which is not natively supported by ELBv2 and all new ELBv2 Load Balancer features the following steps are done in the background:
- From tenant perspective it´s transparent – if a customer calls the LBaaSv2 API to create a load balancer instance, it just creates a record - no real action at the backend takes place at this time.
- Only when the first listener is added, the system will create instances at the backend cluster.
- The system parses the listener parameter, if it´s specifying DR-Mode, then the instance will be placed to the ULB cluster.
- In all other cases the instance will be placed to the new ELBv2 cluster.
Appendix: ECS Member preparation
To make use of DR-mode, the member servers which are assigned to a DR-Mode Listener need to be configured appropriately.
Note that this has not changed in any way with the introduction of ELBv2. We just use the opportunity talking about our Load Balancers to provide this information to our users for convenience and reference.
- Disable source/destination-check on primary NIC of ECS via GUI:
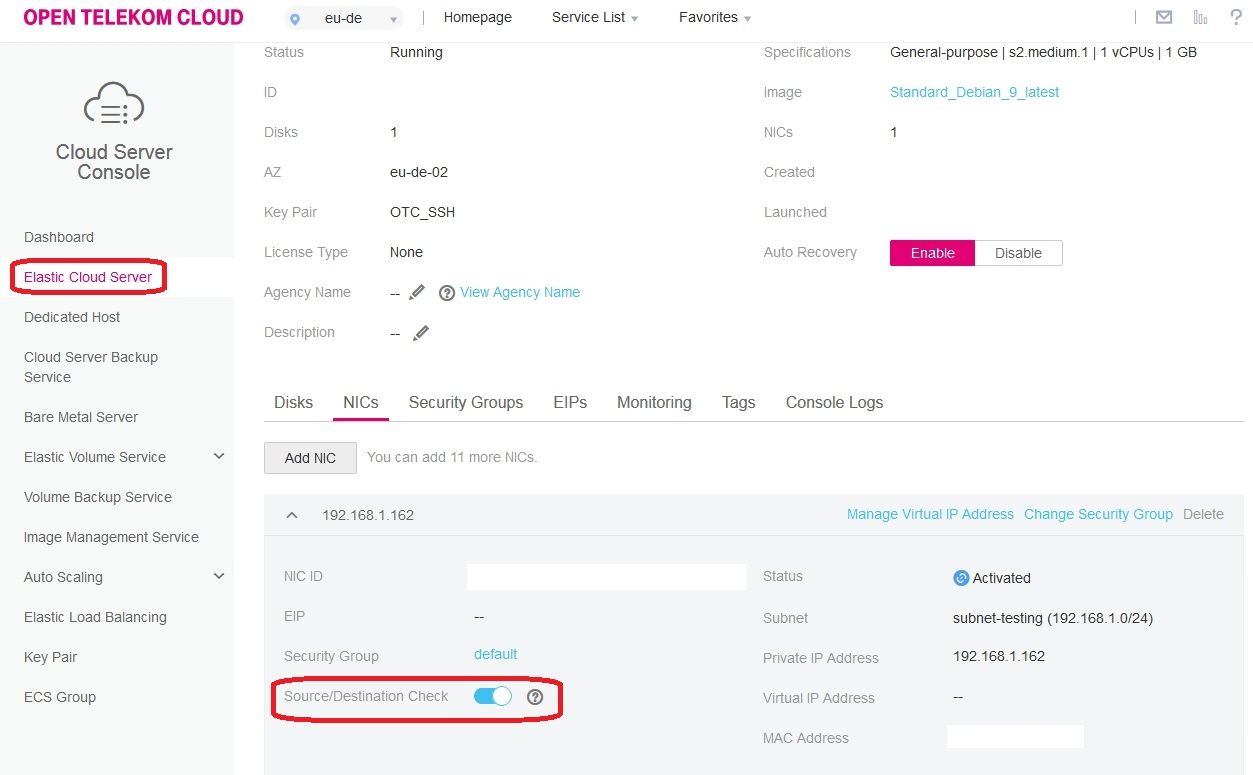
This can also be achieved via API of course:
-
Create a TOKEN (in case you use native API calls, in case you want to use openstack tools explicit token creation is not needed)
export TOKEN=`curl -s -d @user_credentials.json -H "Content-type: application/json" https://iam.eu-de.otc.t-systems.com:443/v3/auth/tokens \ | awk '/X-Subject-Token/ {print $2}'` -
Define the variable PORT_ID
export PORT_ID=YOUR_PORTIDWith OpenStack tools you would just define the ECS_NAME and you could get PORT_ID via this code snippet:
ECS_NAME=XXX IP=$(openstack server list --name $ECS_NAME -f value -c Networks | cut -d = -f 2) PORT_ID=$(neutron port-list -f value | awk '/"'$IP'"/{print $1}') -
GET Request to retrieve the state of the NIC by PORT_ID
curl -s -H "X-Auth-Token: $TOKEN" -H "Content-type: application/json" https://vpc.eu-de.otc.t-systems.com:443/v2.0/ports/${PORT_ID} \
| json_pp | awk '/"allowed_address_pairs"/,/],/{print $0}'
  "allowed_address_pairs" : [],
Here's how to do it via OpenStack tools:
neutron port-show -F allowed_address_pairs -f value $PORT_ID-> The attribute allowed_address_pairs contains an empty array or neutron returns an empty value
-
If we disable source/destination-check via GUI we get this result via API:
curl -s -H "X-Auth-Token: $TOKEN" -H "Content-type: application/json" https://vpc.eu-de.otc.t-systems.com:443/v2.0/ports/${PORT_ID} \
| json_pp | awk '/"allowed_address_pairs"/,/],/{print $0}'
   "allowed_address_pairs" : [
    {
      "ip_address" : "1.1.1.1/0",
      "mac_address" : "MAC_ADDRESS"
    }
   ],
Or with OpenStack tools:
neutron port-show -F allowed_address_pairs -f value $PORT_ID
{"ip_address": "1.1.1.1/0", "mac_address": "MAC_ADDRESS"}
-> To disable source/destination-check via API, we have to use this payload in a PUT request (mac_address is automatically filled):
{ "port": { "allowed_address_pairs": [ { "ip_address": "1.1.1.1/0" } ] } } -
To verify it, we enable source/destination-check again via GUI and try now via API:
curl -s -X PUT -d '{"port": {"allowed_address_pairs": [{ "ip_address": "1.1.1.1/0" }]}}' \
-H "X-Auth-Token: $TOKEN" -H "Content-type: application/json" \
https://vpc.eu-de.otc.t-systems.com:443/v2.0/ports/${PORT_ID}
Or simpler with OpenStack tools:
neutron port-update $PORT_ID --allowed-address-pairs type=dict list=true ip_address=1.1.1.1/0 Updated port: PORT_ID -
New Query:
curl -s -H "X-Auth-Token: $TOKEN" -H "Content-type: application/json" https://vpc.eu-de.otc.t-systems.com:443/v2.0/ports/${PORT_ID} \
| json_pp | awk '/"allowed_address_pairs"/,/],/{print $0}'
  "allowed_address_pairs" : [
   {
    "mac_address" : "MAC_ADDRESS",
      "ip_address" : "1.1.1.1/0"
   }
  ],
or with OpenStack tools (recommended):
neutron port-show -F allowed_address_pairs -f value $PORT_ID {"ip_address": "1.1.1.1/0", "mac_address": "MAC_ADDRESS"} -
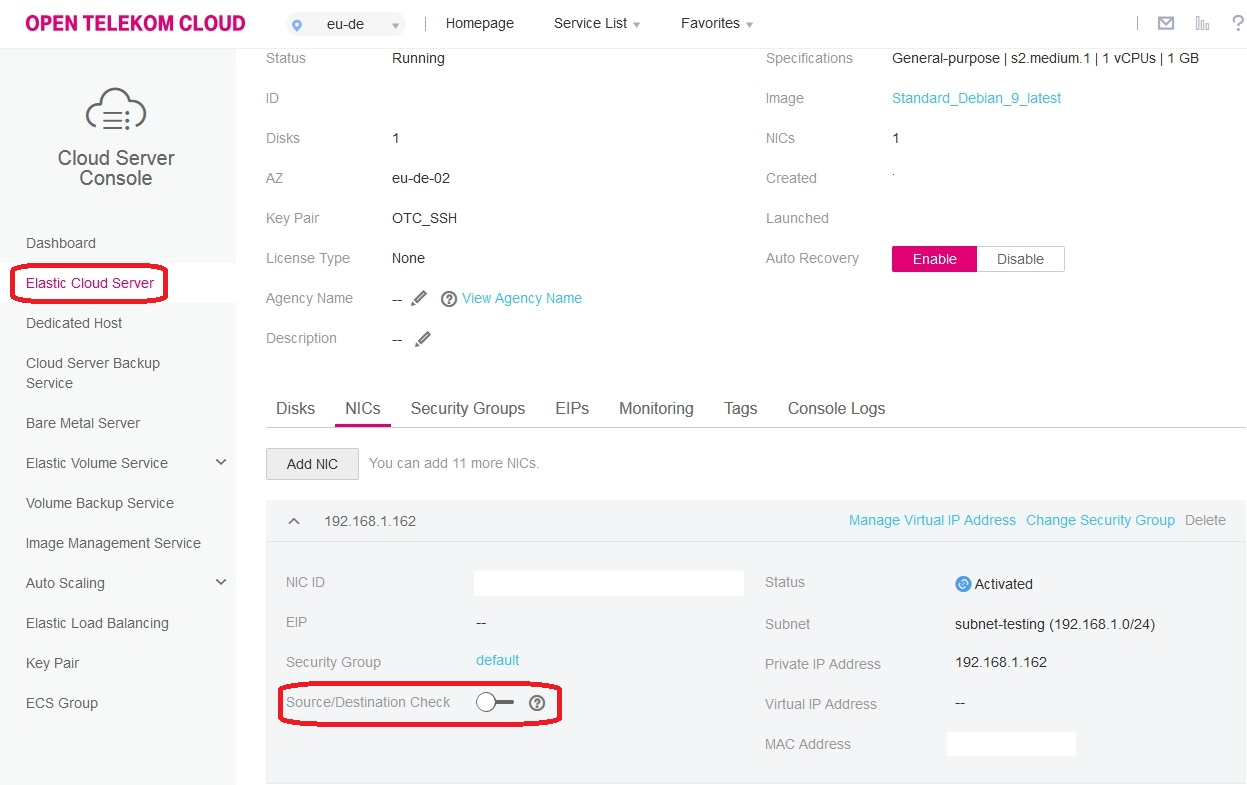
GUI should show a disabled source/destination check
DANGER!
Please be aware that allowing all address pairs for a NIC ("port") by disabling the source/destination check does result in the assigned security groups no longer filtering out any traffic. The security group this port belongs to now covers all IPs; anyone allowing traffic from this security group allows any traffic. We recommend to have a dedicated security group for ports with disabled src/dest checks and to not reference this security group anywhere. The VMs which reference such security groups should have their own filtering/protection/firewall mechanisms in place; we recommend to avoid allowing traffic from this remote security group and instead filter by IP if traffic from such a VM needs to be allowed.
-
Activate special ARP settings on ECS Members (Or: How Do I Configure VMs with Cloud-Init for the DR Load Balancing Scenario?)
You can use cloud-init features to complete the initial configuration of ECSs.
This method also applies to ECS adding in Auto Scaling (AS). Only ECSs running Linux can be configured using this method.
The following is an example command to inject user data (assuming that the VIP of the loadbalancer is 192.168.1.9):
#cloud-config
bootcmd:
- ip addr add 192.168.1.9/32 dev lo
- echo "1" > /proc/sys/net/ipv4/conf/all/arp_ignore
- echo "1" > /proc/sys/net/ipv4/conf/lo/arp_ignore
- echo "2" > /proc/sys/net/ipv4/conf/lo/arp_announce
- echo "2" > /proc/sys/net/ipv4/conf/all/arp_announce
192.168.1.9 is the service IP address of ULB and uses the 32-bit mask.
You can of course use any other system management tool (e.g. ansible) to apply these changes.