
Deploy Kubernetes Cluster via Kubespray with Kata Container support on OTC
![]()
Kata Containers clearlinux.org
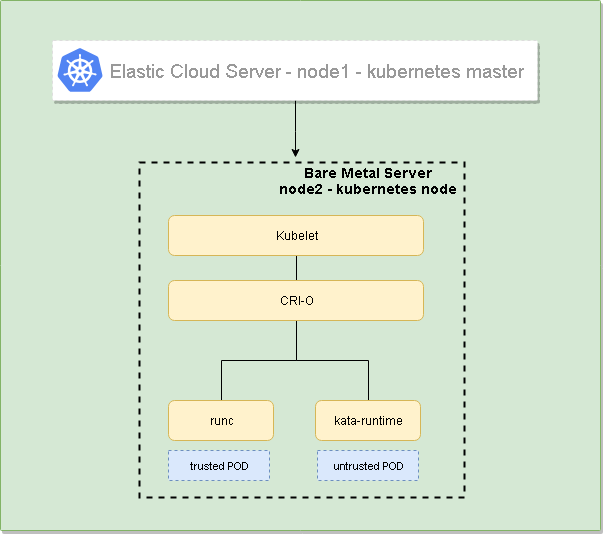
The following guide will help you to install a 2-node Kubernetes cluster with Kubespray and providing Kata Container support. The cluster will consist of one master server which will be built on ECS (Elastic Cloud Server) and one node which will be built on BMS (Bare Metal Server). BMS is being used due to a current limitation of ECS on OTC, the ECS does not support nested virtualization which would be required for Kata runtime.
High-Level Design
The following diagram shows the high-level Design:
Provision the underlying infrastructure on OTC
The underlying infrastructure consists of one ECS acting as Kubernetes master and one BMS acting as Kubernetes node. The table below shows some parameters of the servers used:
| ECS - Kubernetes Master | BMS - Kubernetes Node | |
|---|---|---|
| flavor | s2.large.2 | physical.p1.large |
| OS | Standard_CentOS_7_latest | Standard_CentOS_7_BMS_latest |
| Network | same VPC, Subnet, Security group* | same VPC, Subnet, Security group* |
*The Security group being used is open any-any
Disable the firewall on both the ECS and BMS instance
In order to avoid any troubles with blocking firewall rules on either of the hosts disable the firewall on the OS with the following commands:
sudo systemctl stop firewalld
sudo systemctl disable firewalld
The following steps need to be performed on the Kubernetes master from where Kubespray will install the cluster components
- Install Python 3 which will be required by Kubespray and Ansible
The standard CentOS image does not have EPEL repository by default which will be needed for the Python3 package. This can be installed with the following command:
rpm -ivf http://dl.fedoraproject.org/pub/epel/epel-release-latest-7.noarch.rpm- Install Python 3 and link Python 3.6 binary to Python 3
sudo yum -y install python36
ln -s /usr/bin/python36 /usr/bin/python3- Clone the Kubespray repository and install the necessary requirements
git clone https://github.com/kubernetes-sigs/kubespray

#Install pip
sudo yum install python-pip

#Requirements are in
cat requirements.txt
ansible>=2.5.0,!=2.7.0
jinja2>=2.9.6
netaddr
pbr>=1.6
hvac

#Install the requirements
sudo pip install -r requirements.txt- Copy the private key for SSH key based authentication
Copy the SSH private key to the node that the linux user from the Kubernetes master from where Ansible will install everything is able to connect (don't forget to have 600 permission on the key # chmod 600 \~/.ssh/id_rsa)
- Configure Kubespray - https://github.com/kubernetes-sigs/kubespray/blob/master/docs/getting-started.md
#copy the sample work directory
cp -rfp inventory/sample inventory/mycluster

#192.168.1.75 is the IP of the kubernetes master - node1
#192.168.1.116 is the IP of the kubernetes node - node2
declare -a IPS=(192.168.1.175 192.168.1.116)

#create config
CONFIG_FILE=inventory/mycluster/hosts.ini python3 contrib/inventory_builder/inventory.py ${IPS[@]}

#Modify the hosts.ini file as follows:
cat inventory/mycluster/hosts.ini
[all]
node1    ansible_host=192.168.1.175 ip=192.168.1.175
node2    ansible_host=192.168.1.116 ip=192.168.1.116

[kube-master]
node1

[etcd]
node1

[kube-node]
node2

[k8s-cluster:children]
kube-master
kube-node

[calico-rr]- Configure Kubespray to use CRI-O container runtime (currently Kata is supported by cri-o and cri-containerd only) - https://github.com/kubernetes-sigs/kubespray/blob/master/docs/cri-o.md
#Set the following variables in inventory/mycluster/group_vars/k8s-cluster/k8s-cluster.yml

etcd_deployment_type: host
kubelet_deployment_type: host
container_manager: crio

#Set the following variable in inventory/mycluster/group_vars/all/all.yml

download_container: false- Configure Kubespray to use FLANNEL CNI plugin
#Set the following variable in inventory/mycluster/group_vars/k8s-cluster/k8s-cluster.yml

kube_network_plugin: flannel- After we have successfully configured Kubespray we can start the deployment of Kubernetes cluster
ansible-playbook -i inventory/mycluster/hosts.ini cluster.yml -b -v --private-key=\~/.ssh/id_rsaAfter successful deployment now you should be able to switch to root user and check the Kubernetes cluster. Both node1 and node2 should be in STATUS Ready.
[linux@node1 ~]$ sudo su -
Last login: Thu Dec 13 13:01:29 UTC 2018 on pts/0
[root@node1 ~]# kubectl get node -o wide
NAME    STATUS   ROLES    AGE   VERSION   INTERNAL-IP     EXTERNAL-IP   OS-IMAGE                KERNEL-VERSION               CONTAINER-RUNTIME
node1   Ready    master   20h   v1.13.0   192.168.1.175   <none>        CentOS Linux 7 (Core)   3.10.0-862.14.4.el7.x86_64   cri-o://1.11.10
node2 Ready node 20h v1.13.0 192.168.1.116 <none> CentOS Linux 7 (Core) 3.10.0-862.14.4.el7.x86_64 cri-o://1.11.10- Install the Kata and its components with kata-deploy - https://github.com/kata-containers/packaging/tree/master/kata-deploy
#Deploy the necessary RBAC objects
kubectl apply -f https://raw.githubusercontent.com/kata-containers/packaging/master/kata-deploy/kata-rbac.yaml

#Deploy the Kata components
kubectl apply -f https://raw.githubusercontent.com/kata-containers/packaging/master/kata-deploy/kata-deploy.yaml
The above two commands will create daemonset Kubernetes object which will install the necessary Kata components on all supported nodes (currently Kata is supported on cri-o or cri-containerd), configures cri-o or cri-containerd to use Kata for untrusted workloads and last but not least will label the node with kata-containers.io/kata-runtime=true as you see below:
[root@node1 ~]# kubectl get node --show-labels
NAME    STATUS   ROLES    AGE   VERSION   LABELS
node1   Ready    master   21h   v1.13.0   beta.kubernetes.io/arch=amd64,beta.kubernetes.io/os=linux,kubernetes.io/hostname=node1,node-role.kubernetes.io/master=
node2   Ready    node     21h   v1.13.0   beta.kubernetes.io/arch=amd64,beta.kubernetes.io/os=linux,kata-containers.io/container-runtime=cri-o,kata-containers.io/kata-runtime=true,kubernetes.io/hostname=node2,node-role.kubernetes.io/node=
The following yaml file will create a kubernetes untrusted POD which will be spawned with kata runtime:
nginx-untrusted.yaml
apiVersion: v1
kind: Pod
metadata:
  annotations:
    io.kubernetes.cri-o.TrustedSandbox: "false"
    io.kubernetes.cri.untrusted-workload: "true"
  name: nginx-untrusted
spec:
  containers:
  - name: nginx
    image: nginx
  nodeSelector:
    kata-containers.io/kata-runtime: "true"
The following yaml file will create a kubernetes trusted POD which will be spawned with the default runc rutime:
nginx-trusted.yaml
apiVersion: v1
kind: Pod
metadata:
  name: nginx-trusted
spec:
  containers:
  - name: nginx
    image: nginx
In the below example we can see that both PODs have been scheduled on node2, where nginx-trusetd POD has kernel from the underlying host and nginx-untrusted has its own kernel which is used by kata:
[root@node1 ~]# kubectl apply -f nginx-trusted.yaml
pod/nginx-trusted created
[root@node1 ~]# kubectl apply -f nginx-untrusted.yaml
pod/nginx-untrusted created

[root@node1 ~]# kubectl get pod -o wide
NAME              READY   STATUS    RESTARTS   AGE   IP             NODE    NOMINATED NODE   READINESS GATES
nginx-trusted     1/1     Running   0          16s   10.233.65.9    node2   <none>           <none>
nginx-untrusted   1/1     Running   0          12s   10.233.65.10   node2   <none>           <none>

[root@node1 ~]# kubectl exec -it nginx-trusted  -- uname -r
3.10.0-862.14.4.el7.x86_64

[root@node1 ~]# kubectl exec -it nginx-untrusted -- uname -r
4.14.67