
CCE - Kubernetes NGINX Ingress with Sticky Session
The current version of Cloud Container Engine - CCE (CCEv2 with kubernetes 1.11) supports external access to kubernetes applications via Elastic Load Balancer - ELB which has an assigned Elastic IP - EIP. This allows users to access services from outside of OTC which are load balanced to the backend CCE nodes and then reach the applications running on the kubernetes cluster. However this might bring a challange for applications which require session persistance between the client and the specific server (in CCE case it is container in the POD) for the duration of the session (sticky session). The ELB supports sticky session based on IP addresses, but if we consider the nature of kubernetes applications, then this might not be sufficient. Just imagine and application which runs multiple PODs on the same CCE node and the CCE node has only one IP address to which the ELB sends the traffic.
One possible solution to this issue is to use NGINX Ingress Controller which supports Sticky sessions with "session cookies"
NGINX Ingress Controller - Sticky Sessions
The following steps in this article will show how to setup a sample environment on CCE using NGINX Ingress controller with Sticky sessions.
Let's take a look at the target high level architecture:
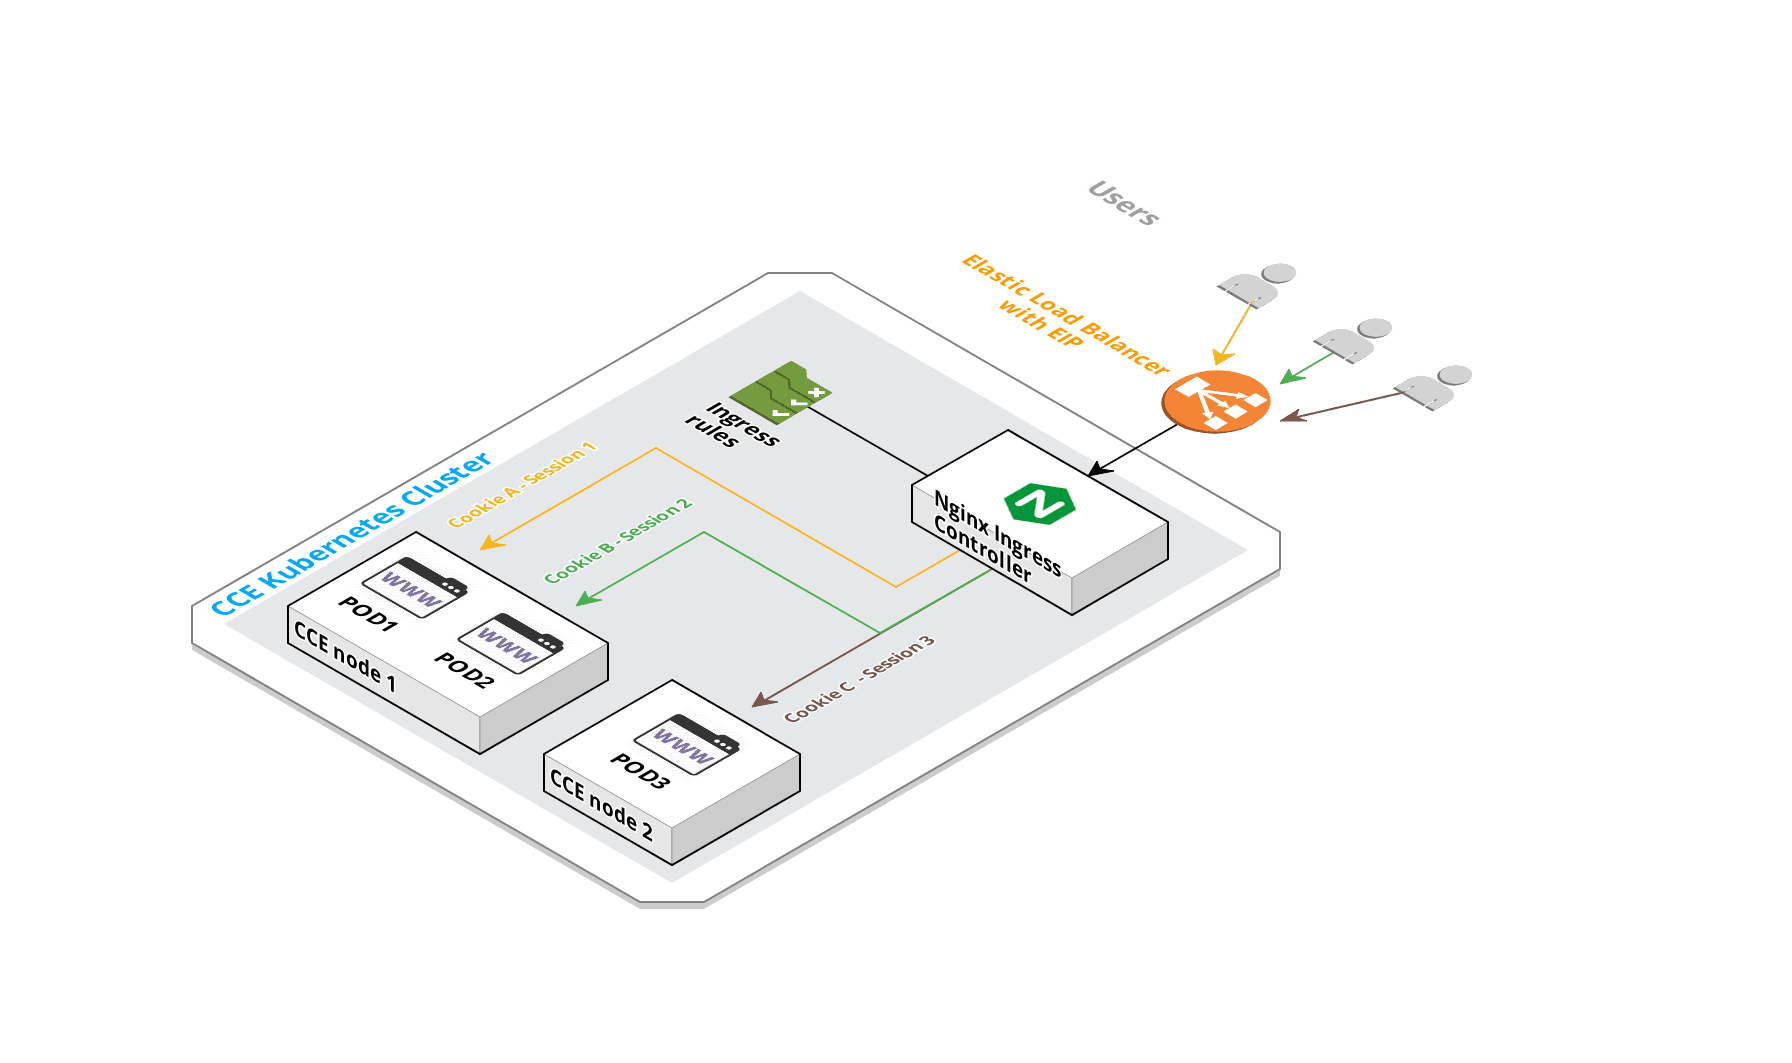 1. High Level architecture
Prerequisite
- A running CCE cluster and an Enhanced Elastic Load Balancer has to be provisioned upfront where both CCE cluster and ELB are in the same VPC/Subnet.
- The CCE cluster has to be version 1.11.x.
- The ELB has to have an Elastic IP assigned
- A server is required from where the CCE cluster can be accessed using the native kubectl client binary
If all works fine, the following command should list the running CCE nodes
[linux@jumphost ~]$ kubectl get nodes -o wide
NAME            STATUS     ROLES    AGE   VERSION                     INTERNAL-IP     EXTERNAL-IP   OS-IMAGE            KERNEL-VERSION                    CONTAINER-RUNTIME
192.168.4.211   Ready      <none>   1d    v1.11.3-r1-CCE2.0.17.B003   192.168.4.211   <none>        EulerOS 2.0 (SP2)   3.10.0-327.62.59.83.h112.x86_64   docker://17.6.1
192.168.4.217   Ready      <none>   1d    v1.11.3-r1-CCE2.0.17.B003   192.168.4.217   <none>        EulerOS 2.0 (SP2)   3.10.0-327.62.59.83.h112.x86_64   docker://17.6.1
Install and Setup the Helm Client
Helm client is used to install the helm chart of NGINX ingress controller. This is the easyiest way to deploy the NGINX ingress controller. Helm client can be installed on the same server where the kubeclt is running and the client can be downloaded here: Helm
Create ServiceAccount and ClusterRoleBinding required for tiller (Tiller is Helm's server-side component, which the helm client uses to deploy resources.)
[linux@jumphost helm]$ cat service-account.yaml
apiVersion: v1
kind: ServiceAccount
metadata:
  name: tiller
  namespace: kube-system
---
apiVersion: rbac.authorization.k8s.io/v1beta1
kind: ClusterRoleBinding
metadata:
  name: tiller
roleRef:
  apiGroup: rbac.authorization.k8s.io
  kind: ClusterRole
  name: cluster-admin
subjects:
  - kind: ServiceAccount
    name: tiller
    namespace: kube-system
[linux@jumphost helm]$ kubectl create -f service-account.yaml
serviceaccount "tiller" created
clusterrolebinding.rbac.authorization.k8s.io "tiller" created
[linux@jumphost helm]$Install tiller with the ServiceAccount:
[linux@jumphost helm]$ helm init --service-account tiller
$HELM_HOME has been configured at /home/linux/.helm.

Tiller (the Helm server-side component) has been installed into your Kubernetes Cluster.

Please note: by default, Tiller is deployed with an insecure 'allow unauthenticated users' policy.
To prevent this, run `helm init` with the --tiller-tls-verify flag.
For more information on securing your installation see: https://docs.helm.sh/using_helm/#securing-your-helm-installation
Happy Helming!
[linux@jumphost helm]$
Tiller POD should be running and helm version should return both client and server version:
[linux@jumphost ~]$ kubectl get pod -n kube-system tiller-deploy-5946b4745f-7g75n
NAME                             READY   STATUS    RESTARTS   AGE
tiller-deploy-5946b4745f-7g75n   1/1     Running   0          6m
[linux@jumphost ~]$ helm version
Client: &version.Version{SemVer:"v2.14.1", GitCommit:"5270352a09c7e8b6e8c9593002a73535276507c0", GitTreeState:"clean"}
Server: &version.Version{SemVer:"v2.14.1", GitCommit:"5270352a09c7e8b6e8c9593002a73535276507c0", GitTreeState:"clean"}
The following command can be used to list all PODs under kube-system namespace and identify the proper name of tiller pod: kubectl get pod -n kube-system | grep tiller
Update the helm repository with the latest charts:
[linux@jumphost helm]$ helm repo update
Hang tight while we grab the latest from your chart repositories...
...Skip local chart repository
...Successfully got an update from the "stable" chart repository
Update Complete. ? Happy Helming!?
[linux@jumphost helm]$
Deploy the NGINX Ingress Controller
In order to have a running LoadBalancer service with ELB a few parameters specific to OTC in the helm chart have to be customized.
- ELB-IP: controller.service.loadBalancerIP=<external ELB IP address>
- ELB-Class: annotations := controller.service.annotations."kubernetes.io/elb.class"=union
- ELB-ID: controller.service.annotations."kubernetes.io/elb.id"=<Elastic Load Balancer ID>
The ELB EIP has to be defined into the loadBalancerIP and set proper annotations. The elb.class has to be set to union and elb.id to the actual ELB ID. The ELB ID and the ELB EIP can be gathered from OTC either via GUI console or API.
Those parameters are set directly in the helm command with --set as seen below.
Install the nginx-ingress controller with helm:
[linux@jumphost ~]$ helm install stable/nginx-ingress --name pluto --set controller.service.loadBalancerIP="80.158.7.80",controller.service.annotations."kubernetes\.io/elb\.class"=union,controller.service.annotations."kubernetes\.io/elb\.id"=c2019e57-0018-4a43-811e-da7da0e49994
NAME:   pluto
LAST DEPLOYED: Fri Jul 12 09:44:35 2019
NAMESPACE: default
STATUS: DEPLOYED

RESOURCES:
==> v1/Pod(related)
NAME                                                  READY  STATUS             RESTARTS  AGE
pluto-nginx-ingress-controller-667cc57678-mjk78       0/1    ContainerCreating  0         0s
pluto-nginx-ingress-controller-667cc57678-pws2t       1/1    Terminating        0         10m
pluto-nginx-ingress-default-backend-568b67cb7b-vcrvx  0/1    ContainerCreating  0         0s

==> v1/Service
NAME                                 TYPE          CLUSTER-IP     EXTERNAL-IP  PORT(S)                     AGE
pluto-nginx-ingress-controller       LoadBalancer  10.247.131.73  <pending>    80:32692/TCP,443:32256/TCP  0s
pluto-nginx-ingress-default-backend  ClusterIP     10.247.97.40   <none>       80/TCP                      0s

==> v1/ServiceAccount
NAME                 SECRETS  AGE
pluto-nginx-ingress  1        0s

==> v1beta1/ClusterRole
NAME                 AGE
pluto-nginx-ingress  0s

==> v1beta1/ClusterRoleBinding
NAME                 AGE
pluto-nginx-ingress  0s

==> v1beta1/Deployment
NAME                                 READY  UP-TO-DATE  AVAILABLE  AGE
pluto-nginx-ingress-controller       0/1    1           0          0s
pluto-nginx-ingress-default-backend  0/1    1           0          0s

==> v1beta1/Role
NAME                 AGE
pluto-nginx-ingress  0s

==> v1beta1/RoleBinding
NAME                 AGE
pluto-nginx-ingress  0s

NOTES:
The nginx-ingress controller has been installed.
It may take a few minutes for the LoadBalancer IP to be available.
You can watch the status by running 'kubectl --namespace default get services -o wide -w pluto-nginx-ingress-controller'

An example Ingress that makes use of the controller:

  apiVersion: extensions/v1beta1
  kind: Ingress
  metadata:
    annotations:
      kubernetes.io/ingress.class: nginx
    name: example
    namespace: foo
  spec:
    rules:
      - host: www.example.com
        http:
          paths:
            - backend:
                serviceName: exampleService
                servicePort: 80
              path: /
    # This section is only required if TLS is to be enabled for the Ingress
    tls:
        - hosts:
            - www.example.com
          secretName: example-tls

If TLS is enabled for the Ingress, a Secret containing the certificate and key must also be provided:

  apiVersion: v1
  kind: Secret
  metadata:
    name: example-tls
    namespace: foo
  data:
    tls.crt: <base64 encoded cert>
    tls.key: <base64 encoded key>
  type: kubernetes.io/tls

[linux@jumphost ~]$
It takes a while till every component is up and running, but eventually the PODs should be in Running STATUS and the LoadBalancer service should have the defined EIP as EXTERNAL-IP:
[linux@jumphost nginx-ingress]$ kubectl get pod
NAME                                                   READY     STATUS    RESTARTS   AGE
pluto-nginx-ingress-controller-7f8f47d5ff-xz6pw        1/1       Running   0          12m
pluto-nginx-ingress-default-backend-55dffd9f5d-c5n6l   1/1       Running   0          12m
[linux@jumphost nginx-ingress]$ kubectl get service
NAME                                  TYPE           CLUSTER-IP       EXTERNAL-IP   PORT(S)                      AGE
kubernetes                            ClusterIP      10.247.0.1       <none>        443/TCP                      3h
pluto-nginx-ingress-controller        LoadBalancer   10.247.83.135    80.158.7.80   80:31699/TCP,443:32395/TCP   12m
pluto-nginx-ingress-default-backend   ClusterIP      10.247.176.141   <none>        80/TCP                       12m
[linux@jumphost nginx-ingress]$
Deploy the Backend Sample Application
The following YAML manifest files are used to deploy the backend sample application:
[linux@jumphost elb-ingress-sticky]$ cat amsterdam-with-ip.yaml
---
apiVersion: extensions/v1beta1
kind: Deployment
metadata:
  creationTimestamp: null
  labels:
    run: amsterdam
  name: amsterdam
spec:
  replicas: 3
  selector:
    matchLabels:
      run: amsterdam
  strategy: {}
  template:
    metadata:
      creationTimestamp: null
      labels:
        run: amsterdam
    spec:
      containers:
      - image: nginx
        name: amsterdam
        volumeMounts:
        - name: init-web-content
          mountPath: /usr/share/nginx/html/
      initContainers:
      - name: init-web-content
        image: busybox:latest
        command: ["/bin/sh", "-c", "echo Amsterdam - $POD_ID > /tmp/index.html"]
        volumeMounts:
        - name: init-web-content
          mountPath: /tmp
        env:
        - name: POD_ID
          valueFrom:
            fieldRef:
              fieldPath: status.podIP
      volumes:
      - name: init-web-content
        hostPath:
          path: /data
---
apiVersion: v1
kind: Service
metadata:
  creationTimestamp: null
  labels:
    run: amsterdam
  name: amsterdam
  selfLink: /api/v1/namespaces/default/services/amsterdam
spec:
  ports:
  - port: 80
    protocol: TCP
    targetPort: 80
  selector:
    run: amsterdam
  sessionAffinity: None
  type: ClusterIP
status:
  loadBalancer: {}
[linux@jumphost elb-ingress-sticky]$
Created the Deployment and Service related to our sample application:
[linux@jumphost elb-ingress-sticky]$ kubectl create -f amsterdam-with-ip.yaml
deployment.extensions/amsterdam created
service/amsterdam created
[linux@jumphost elb-ingress-sticky]$
Check the status of the PODs:
[linux@jumphost elb-ingress-sticky]$ kubectl get deployment  -l run=amsterdam -o wide
NAME        DESIRED   CURRENT   UP-TO-DATE   AVAILABLE   AGE   CONTAINERS   IMAGES   SELECTOR
amsterdam   3         3         3            3           4m    amsterdam    nginx    run=amsterdam
[linux@jumphost elb-ingress-sticky]$
[linux@jumphost elb-ingress-sticky]$ kubectl get pod  -l run=amsterdam -o wide
NAME                         READY   STATUS    RESTARTS   AGE   IP             NODE            NOMINATED NODE
amsterdam-7858b99884-6dfqp   1/1     Running   0          2m    172.16.0.101   192.168.4.211   <none>
amsterdam-7858b99884-c8skr   1/1     Running   0          2m    172.16.0.102   192.168.4.211   <none>
amsterdam-7858b99884-cm92p   1/1     Running   0          2m    172.16.0.87    192.168.4.217   <none>
[linux@jumphost elb-ingress-sticky]$
[linux@jumphost elb-ingress-sticky]$ kubectl get service  -l run=amsterdam -o wide
NAME        TYPE        CLUSTER-IP      EXTERNAL-IP   PORT(S)   AGE   SELECTOR
amsterdam   ClusterIP   10.247.211.13   <none>        80/TCP    4m    run=amsterdam
[linux@jumphost ~]$ kubectl describe service amsterdam
Name:              amsterdam
Namespace:         default
Labels:            run=amsterdam
Annotations:       <none>
Selector:          run=amsterdam
Type:              ClusterIP
IP:                10.247.211.13
Port:              <unset>  80/TCP
TargetPort:        80/TCP
Endpoints:         172.16.0.101:80,172.16.0.102:80,172.16.0.87:80
Session Affinity:  None
Events:            <none>
[linux@jumphost ~]$
This created a deployment called amsterdam which created 3 PODs, 2 of them are running on the first CCE node and the third POD is running on the second CCE node.
Deploy the NGINX Ingress Rule with Sticky Sessions
The following YAML manifest is used to deploy the NGINX ingress rule which uses the required annotations to use cookie based sticky session.
For more details on the annotations, please visit the official documentation.
In general http request to host amsterdam.dynu.net on port 80 will be routed to the service amsterdam which has 3 endpoints (these points to the 3 POD IP addresses) as we could see in the previous section.
[linux@jumphost elb-ingress-sticky]$ cat ingress-rules-sticky.yaml
apiVersion: extensions/v1beta1
kind: Ingress
metadata:
  name: ingress-rules
  annotations:
    nginx.ingress.kubernetes.io/affinity: "cookie"
    nginx.ingress.kubernetes.io/session-cookie-name: "route"
    nginx.ingress.kubernetes.io/session-cookie-expires: "172800"
    nginx.ingress.kubernetes.io/session-cookie-max-age: "172800"
    nginx.ingress.kubernetes.io/force-ssl-redirect:      "false"
spec:
  rules:
  - host: amsterdam.dynu.net
    http:
      paths:
      - path: /
        backend:
          serviceName: amsterdam
          servicePort: 80
[linux@jumphost elb-ingress-sticky]$
Deploy the ingress rule:
[linux@jumphost elb-ingress-sticky]$ kubectl create -f ingress-rules-sticky.yaml
ingress.extensions/ingress-rules created
[linux@jumphost elb-ingress-sticky]$
Let's perform a test...
First lets try to access the web application with a http browser on http://amsterdam.dynu.net address. As the browser does not have a cookie yet, the NGINX ingress controller will issue a new cookie which will be stored by the web browser and then routed to the first POD (application container). All subsequent requests will go to the same POD until the cookie is deleted manually or expired.
Proper DNS resolution is required for the tests. In this sample example the dynu.net free service is used and the amsterdam.dynu.net is pointing to the EIP of the ELB.
This can be seen in the following screenshot:
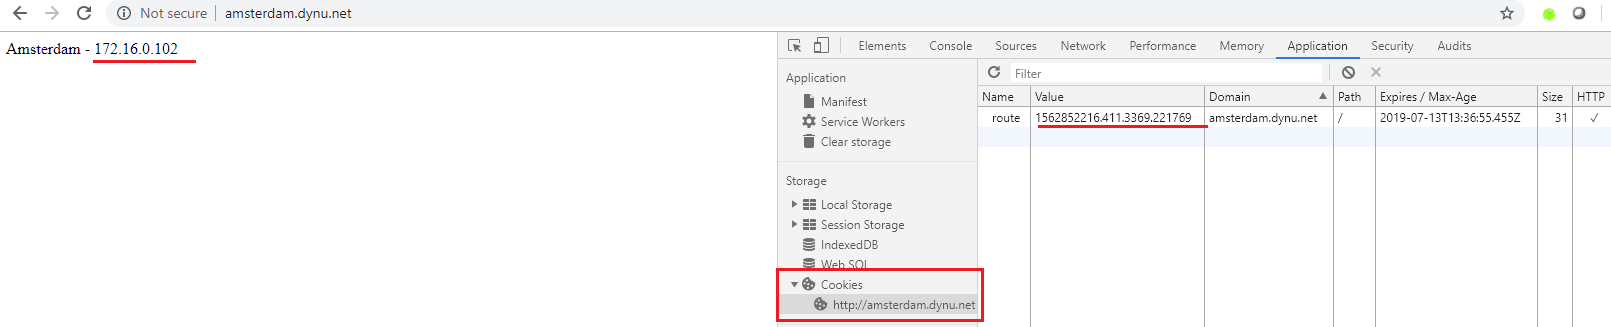 2. Example with cookie1
When the cookie is deleted manually and a new request is sent the NGINX ingress controller issues a new token and routes the traffic to the next POD as we can see in the next screenshot:
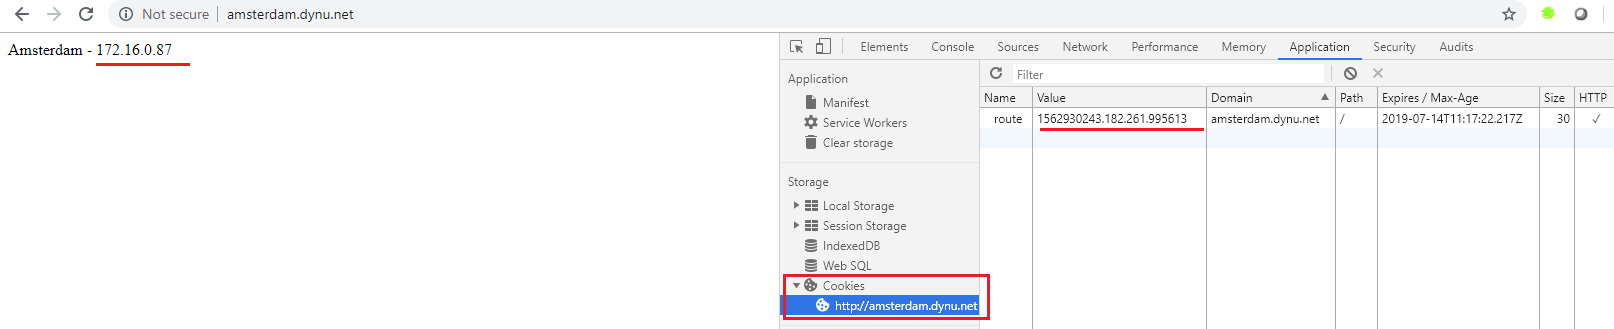 3. Example with cookie2
Further Consideration
- this sample application does not involve TLS encryption which obviously can be achieved in different ways. One option is to terminate the TLS on the nginx-ingress-controller and store the TLS certificates as kubernetes secrets. An example scenario can be found in the official documentation TLS termination
- this sample scenario does not address high availability of the NGINX ingress controller. This is also visible in the ELB listeners that the Backend Server Groups contain only one CCE node, obviously the one on which the pluto-nginx-ingress-controller POD is running as the service used by the NGINX ingress controller is associated with the ELB. One option is to simply scale up the number of replicas of the deployment:
kubectl scale deployment pluto-nginx-ingress-controller --replicas=2