
Guide for using SNAT on OTC
Overview
The Open Telekom Cloud_ (OTC) allows customers to associate elastic IPs (floating IPs) with vNICs (ports) on Virtual Machines (VMs) to expose them to the internet and support in- and outgoing connections.
Many VMs only serve internal purposes and thus do not need to be directly reachable from the internet; for some of them, the public services_ provided by OTC (such as DNS, NTP and update repository mirrors) may not be sufficient and outgoing internet access is still needed e.g to retrieve information or download software.
Assigning a public IP to each of these VMs would consume a scarce resource (IPv4 addresses are precious), incur additional cost and may increase the attack surface; instead sharing one public IP address with many VMs is preferable. This can be done using Source-NAT (SNAT_).
Since early June 2017, OTC supports an SNAT platform service; if just outgoing traffic to the internet is required, this is the easiest and recommended solution. It will be described in the new first section of this document.
Since February 2017, OTC also supports the model of a routing/SNAT instance; here one VM is configured with a public IP address and serves as an SNATting router/gateway for a set of VMs from the same subnet or VPC. Setting this up requires a lot more skills and effort and comes with some security considerations; it was the only solution until June and the original description with some security considerations highlighted even stronger are described in the second section. That section describes how to set up and secure this SNAT instance and describes the settings needed to make this work, and to have other VMs use it, for outgoing internet access.
Platform SNAT feature
Since early June 2017, OTC offers an opt-in platform feature to support SNAT.
While setting up a pair of SNAT instances (as described in the second section below) offers a lot of flexibility (you can set up port forwarding, reverse proxys, WAFs, load balancers, JumpHosts, ... this way), just configuring EIP-less VMs to have outgoing internet access has become very straight-forward with the platform SNAT feature.
To opt-in to platform SNAT, just change the enable_snat field in the
external_gateway_info of your VPC router to true.
This can be done using
neutron router-gateway-set --enable-snat VPC-ROUTER-ID admin_external_netThe disabling works the same way, using --disable-snat.
Note that the now recommended neutron tool version (from the OpenStack
Newton release, 6.0.0) needs a backport to support snat enablement
(disablement curiously works). The openSUSE42 and SLES12 public images
carry a neutron client tool with this patch already; if yours does not,
you can use newer version of python-neutronclient tools, or revert to
using otc-tools_ which supports enabling/disabling SNAT as well. The
patch is included since version 6.0.2.
For your reference, here is the five-line backport for neutron in case you want to patch the neutron client yourself.
# python-neutronclient assumes that snat is enabled by default, so it
# only supports disabling, but not enabling it explicitly.
# This has been fixed in latest upstream versions.
# This is my minimal version of this feature. -KG

Index: neutronclient/neutron/v2_0/router.py
===================================================================
--- neutronclient/neutron/v2_0/router.py.orig
+++ neutronclient/neutron/v2_0/router.py
@@ -235,6 +235,9 @@ class SetGatewayRouter(neutronV20.Neutro
         'external_network', metavar='EXTERNAL-NETWORK',
         help=_('ID or name of the external network for the gateway.'))
     parser.add_argument(
+            '--enable-snat', action='store_true',
+            help=_('Enable source NAT on the router gateway.'))
+        parser.add_argument(
         '--disable-snat', action='store_true',
         help=_('Disable source NAT on the router gateway.'))
     parser.add_argument(
@@ -258,6 +261,8 @@ class SetGatewayRouter(neutronV20.Neutro
     router_dict = {'network_id': _ext_net_id}
     if parsed_args.disable_snat:
         router_dict['enable_snat'] = False
+        if parsed_args.enable_snat:
+            router_dict['enable_snat'] = True
     if parsed_args.fixed_ip:
         ips = []
         for ip_spec in parsed_args.fixed_ip:
Note that the platform SNAT feature can not yet be enabled using the OTC Web interface; you need to do this via API calls. The API interface for this setting is the same as in other OpenStack clouds; many of them however default to SNAT being enabled, so you always get internet access as soon as you configure an external gateway net in your router; instead in OTC the external router is always configured (to make floating IPs work without any further ado), but the SNAT feature is disabled by default.
SNAT instance config
If you only need SNAT, it is recommended to use the above described SNAT platform feature. Nevertheless, by using an SNAT instance, you can implement advanced routing features and policies, such as e.g. setting up openVPN tunnels and defaulting to routing packets via them. The below description covers the basic functions needed to just set up SNAT -- it was created when the platform SNAT feature was not yet available. It is still useful as a reference that you can use to base more advanced setups upon. If you do this, please keep in mind the security implications of allowing all addresses (allowed-address-pairs setting) to be forwarded via some ports -- the security group containing these ports will allow everything in ...
Setting up SNAT
Many operating systems support routing packets. What we need is the operating system to rewrite the source address of the packets to its own address before forwarding them, so they are sent out with a public sender address and the return packets can find their way back. This method is called source network address translation (SNAT). The operating system needs to keep track of the SNATted packets, so when the answers are returned, the destination address can be rewritten (DNAT) and the packet be forwarded to the initial sender. We will quickly outline how this can be achieved on Linux.
Basically, you enable IP forwarding sysctl -w net.ipv4.ip_forward=1
and set up the SNAT rule
iptables -t nat -A POSTROUTING -j SNAT -o eth0 -s NET/PREFLEN --to OWNIP.
The process is explained in detail in chapter 3.10 of the VPC user docs
of the OTC documentation_.
Allowing routed packets
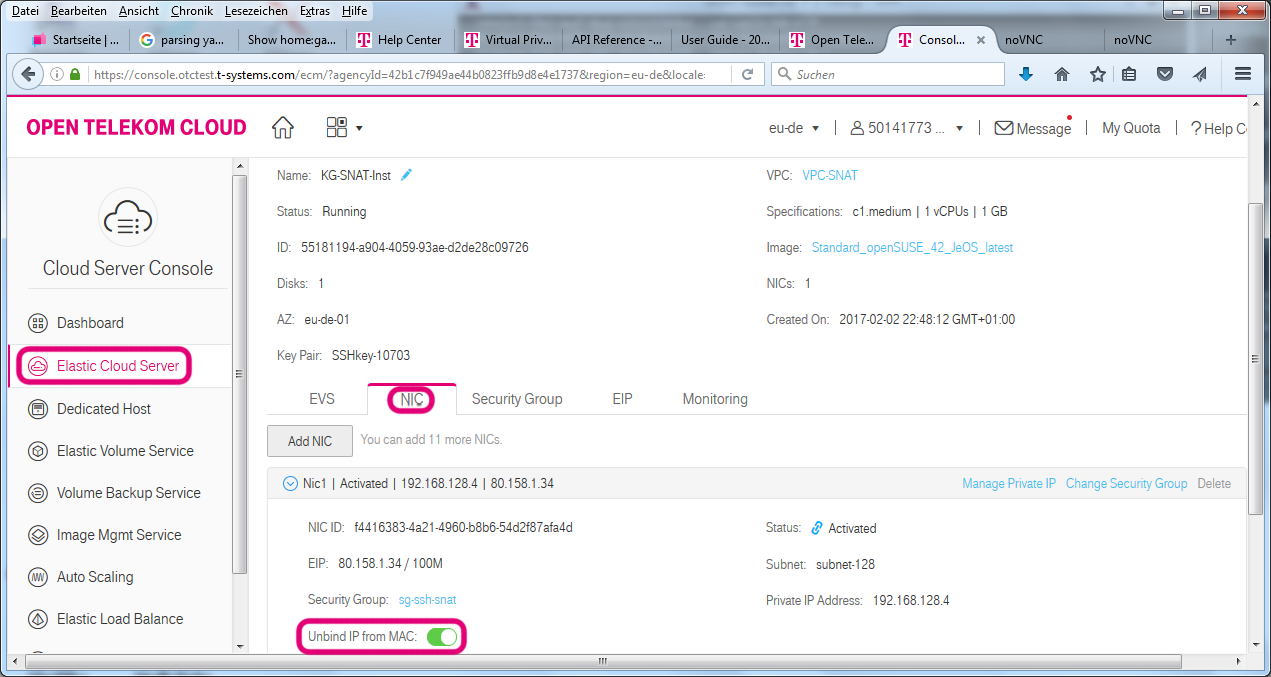
The OpenStack networking component neutron does not normally allow a VM to send packets with a sender IP address that differs from its own address. This increases security by protecting against spoofed packets. For our SNAT scenario however, when the returning packet is forwarded from the SNAT instance to the VM originating the connection, neutron would block this, as the SNAT instance forwards a packet with a source IP address it does not own.
neutron can be instructed to disable this protection. The Web Interface ("Service Console") supports this by using the "Unbind IP from MAC" option to the virtual NIC.
On the command line, we need to identify the network interface (port) of the SNAT instance and use
neutron port-update PORTID --allowed-address-pairs type=dict list=true ip_address=0.0.0.0/1 ip_address=128.0.0.0/1This will tell neutron to allow packets with any sender addresses being sent from this port. [*]_
Security considerations
The SNAT instance has an external IP address; thus it is fully exposed to the internet. It is advisable to protect this instance well, which includes both network protection mechanisms (firewall rules or at least closing open ports), avoiding ssh password authentication (this is switched off on all public images in OTC by default) and diligently keeping up with security updates.
danger
Be aware that the filtering mechanims used by security groups (SGs) are based on IP addresses. By allowing any address to be used by a network interface (port), the SG that contains this port will contain all IP addresses. This means that if you allow traffic from that SG in any SG, this will open up traffic from anywhere -- likely not what you intended. Most SGs allow all SG-internal traffic; with the allowed-address-pairs setting this inside this group, it means that in reality, there is no security protection at all by SGs for the ports in this SG. The same applies to other SGs that allow ingress traffic from this SG.
So you really should make the SNAT instance carefully protect itself. As the same interface is used for the internal connection to the subnet as well as to the internet, filtering rules can not be set up based on the network interface name which make the network protection a bit trickier.
attention
Remember: Do not create SGs that broadly allow ingress traffic from the SNAT instances' SG!
The security group protection applied to the internal servers is, of course, as effective as ever, if you avoid referencing the SNAT instances' SGs there.
Using the prepared SNAT images
Setting up the iptables rules to configure the SNAT functionality, on one hand, and protecting the instance well, on the other, may seem reasonably simple for experienced Linux administrators. However, making mistakes in the firewall rules might put the instance at a security risk, so we advise only very experienced admins to configure all of this on their own. The prepared firewall scripts from established Linux distributions may help to get things right here.
To make things easier, the OTC engineering team (ImageFactory_ team) has preconfigured some of the public images to set up all the rules for the user by just using a few custom lines of YAML in the user_data.
The most simple setup looks like this:
#cloud-config
# Other cloud-init settings
otc:
   snat:
      masqnet:
         - LOCALNET
This little configuration is picked up by
/usr/lib/cloud-init/snat_setup.sh (from the snat_setup.service
belonging to the SuSEfirewall2-snat package) during the init process
and it will configure SNAT for its own subnet.
Behind the scenes, this uses SUSE's SuSEfirewall2 script to set up SNAT
and protections; in the default configuration, while SNAT routing is
enabled, the instance itself will only accept incoming connections to
TCP port 22, where the ssh daemon sshd listens. When studying the
generated rules, please note that the MASQUERADE target is used rather
than SNAT target in the iptables rules -- the result is the same.
You can also offer the SNAT service to machines outside its own subnet.
otc:
   internalnet:
      - LOCALNET
      - 172.16/12
   snat:
      masqnet:
         - 10/8,8.8.8.8,udp,53
         - INTERNALNET
This would offer SNAT to all VMs in the subnet of the SNAT instance; in addition the 172.16/12 (private) network can talk to the world as well as allowing all machines in the (private) 10/8 net to send UDP packets to port 53 of 8.8.8.8 (google DNS).
The example shows one additional feature: In SuSEfirewall2, you normally
configure multiple zones and these depend on the network device. In our
SNAT instance setup, we only use one NIC -- the differentiation between
internal, DMZ_ and external zone is thus done via the source address of
the packets. While this is in general not very secure, the fact that
OpenStack neutron controls valid MAC-IP combinations
(allowed-address-pairs) does make this reasonable. The above snippet
would tell SuSEfirewall2 to consider packets from these nets as internal
and you might apply different rules to these than to other packets. The
nets are then referenced for the masquerading rules with INTERNALNET.
The same can be dome with otc.dmznet setting and DMZNET. Note that,
by default, SuSEfirewall2 does not filter packets from the internal
zone.
The SNAT configuration through user_data depends on SuSEfirewall2 and
shyaml; so your SNAT instances need to use the openSUSE42_JeOS,
openSUSE42_Docker and SLES12_SP2 images starting from February 2017
to support this way of configuring SNAT instances.
Please remember that while the preconfigured images take away the need
to setup iptables for doing SNAT/MASQUERADING and some protection
yourself, the neutron --allowed-address-pairs (aka Unbind IP from MAC)
magic is still needed.
Advanced options
The otc.snat section also allows for two other settings:
- The
otc.snat.nomasqnetlist allows a list of networks or hosts that are excluded from receiving any SNAT / masquerading service to be set up. - The
otc.snat.fwdmasqallows port forwarding to be set up. As we have a fully functional public IP address, we can also use it to forward certain connections to hosts without an EIP.0/0,192.168.208.5,tcp,222,22would forwardtcpconnections to port222of the SNAT instance's EIP from the internet (0/0) to port22of host192.168.208.5. Note that the SG for the port with IP192.168.208.5would have to allow this too; as mentioed above, do not allow all traffic from the SNAT instance's SG there.
To read more about the possibilities, we recommend consulting the
documentation and examples in /etc/sysconfig/SuSEfirewall2 on a SUSE
VM. Be aware of the following relationships:
Setting SuSEfirewall2 variable
otc.snat.masqnet FW_MASQ_NETS otc.snat.nomasqnet FW_NOMASQ_NETS otc.snat.fwdmasq FW_FORWARD_MASQ
For full flexibility, the snat_setup.sh script also allows any other
setting in the SuSEfirewall2 config file to be overridden. The syntax
is straight forward:
otc:
   SFW2:
      VAR1: VAL1
      VAR2: VAL2
By setting FW_SERVICES_EXT to "22 80 443" you could for example open
up two more popular ports on the SNAT instance on your SNAT instance --
not a good idea normally; the default of only allowing port 22 (ssh)
plus some harmless ICMP was chosen carefully.
Another nice advanced feature you could use is
otc:
   SFW2:
      FW_HTB_TUNE_DEV: eth0,10000
to use the outbound traffic shaper built in SuSEfirewall2. The above settings will limit the outbound traffic on eth0 to just below 10Mbps. If there is more traffic the packets would queue up on the SNAT instance and be prioritized there -- small packets and those from interactive traffic would be preferred -- if the queue gets completely filled, the packets at the end of the queue would get dropped, indicating to the sender that it should slow down sending packets. (While dropping packets may sound like an intrusive measure here, it is the completely normal way of exerting back-pressure on senders in TCP/IP; TCP handles this really well and you can finetune things by chosing optimized TCP congestion algorithms.)
For small environments, your SNAT instance might be your only internet facing machine. Unless you have VPN set up, it might thus be your only access to the environment (except for the emergency noVNC console in the OTC web interface). You might find it worthwhile to know that the openSUSE and SLES images also have a rather complete set of OpenStack and OTC and kubernetes command line tools installed, so you can also use it for other adminstrative purposes. You should carefully consider this added convenience against security considerations though; experience tells that assigning too different roles to a machine will make it hard to have a consistent security concept due to conflicting requirements.
Security (reprise)
The firewall rules in the preconfigured settings add some level of protection. The ssh port however is open (you need it for administrative purposes after all), so in no circumstances should you allow ssh password authentication on this VM. (It is not enabled by default, of course!)
You will observe repeated login attempts from various script kiddies in
the internet and you can find traces in the log. With a secure sshd
config, these do not pose a risk (unless there is a zeroday in sshd
that allows unauthenticated users to attack your system). But they can
still be annoying. Here are two things you could do to stop the
annoyance:
- You move your ssh to listen on another port. This of course does not
help against skilled attackers, but still keeps the kids away. Use
otc.movessh: ALTPORTto runsshdon another port. The script will take care of adapting the firewall rules as well. - You can enable an iptables based
sshdattack protection: When an attacker runs too many short lived ssh connections from one host, the VM will block this IP henceforth for an hour or so. Note that this has a certain risk of shutting out legit traffic, especially if a corporate proxy is in the network path. We would thus not in general advice to use it without extensive testing. Useotc.fail2ban: trueif you want to try this out. Note: The limits are not currently adjustable; contact us if you need this in a future version.
If you do not need access to the ssh port from the outside (e.g. because you use the IPsec VPN), you can also close it down by setting
otc:
   SFW2:
      FW_SERVICES_EXT:
If you use the otc.internalnet: definition, this will still leave
ssh open to the internal net.
There is another setting worth mentioning: You should install security updates regularly to keep systems safe. However, you might want to minimize additional work to interact with the SNAT instance, so an automated installation of updates would be handy. Here's how to enable it:
otc:
   autoupdate:
      frequency: daily
      categories: security recommended
This would install security and recommended patches from your OS vendor
every day. (You can also setup weekly or monthly. The categories and
more settings can be found in /etc/sysconfig/automatic_online_update.)
Note that this is not yet a zero maintenance setup -- it is still
recommended to occasionally check whether a kernel update requires a
reboot. On the other hand, following cloud patterns, you might rebuild
and redeploy these VMs regularly anyway.
danger
Remember that the security group that the SNAT instances ports belong to are poisoned by the allowed-address-pairs; do not broadly allow traffic from that security group anywhere!
Redundant (HA) setup
If the availability of your application depends on the outgoing internet access, you probably want to ensure it continues to work in case a SNAT instance fails. Designing for failure of a complete availability zone (AZ) allows very good availability in a cloud.
This section describes how to use a virtual IP and a pair of two VMs to provide a highly available SNAT setup.
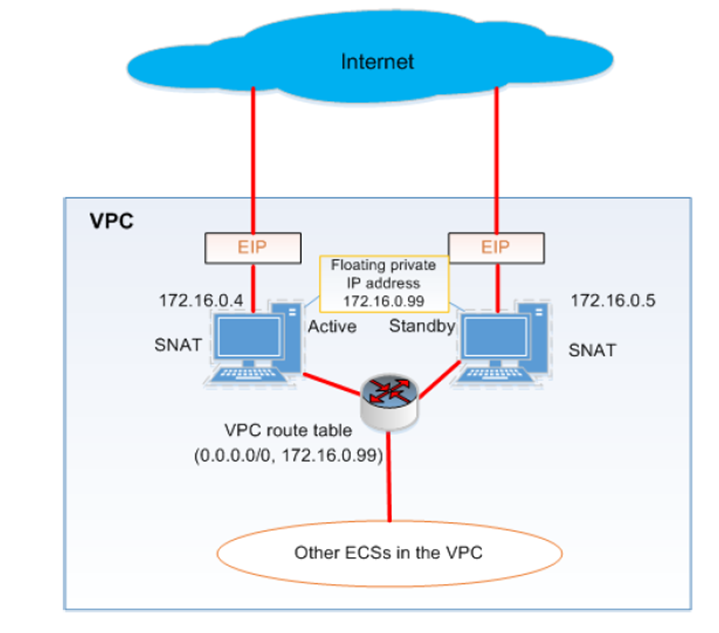
Here we create a network and subnet that spans both AZs for the two SNAT instances and put one in each AZ. On the Web Interface you can allocate Virtual IPs in the VPC / subnet menu, Manage Private IP Address.
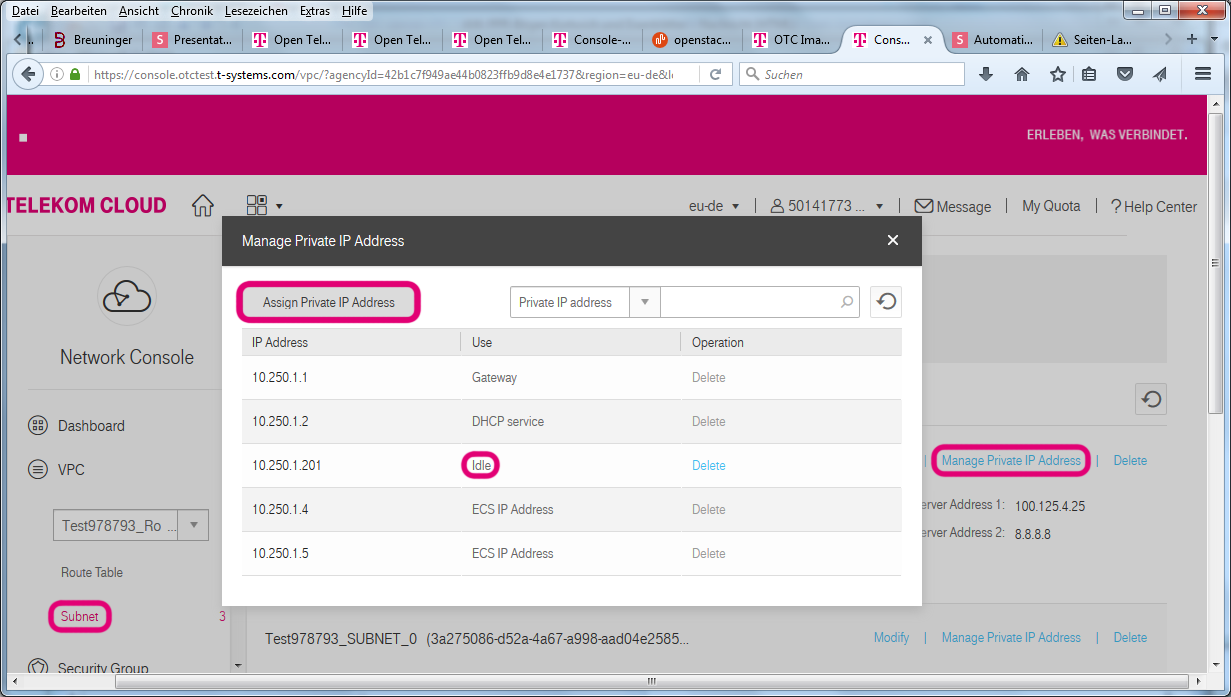
You would normally have to allow this address on the SNAT-instance ports (Bind private IP); however, we have already allowed all addresses before to make SNAT work, so no extra work is needed.
The only missing piece is to make your SNAT instances use the virtual IP
address by logging into the VMs and issuing the command
ip addr add VIP/32 dev eth0.
You can fully automate this, the custom cloud-init user_data feature
offers to use the otc.addip setting for this.
# Assumptions: VPC-ROUTER exists, $SNATSG contains security-group ID
getid() { FIELD=${1:-id}; grep "^| $FIELD " | sed -e 's/^|[^|]*| \([^|]*\) |.*$/\1/' -e 's/ *$//'; }
listid() { grep $1 | tail -n1 | sed 's/^| \([0-9a-f-]*\) .*$/\1/'; }
SNATNET=$(neutron net-create SNAT-NET | getid)
SNATSUB=$(neutron subnet-create --dns-nameserver 100.125.4.25 --dns-nameserver 8.8.8.8 --name SNAT-SUBNET SNAT-NET 172.16.0.0/24 | getid)
neutron router-interface-add VPC-ROUTER $SNATSUB
neutron port-create --name SNAT-VIP --security-group SNAT-SG-DANGERZONE --fixed-ip subnet_id=$SNATSUB,ip_address=172.16.0.99
cat > user_data.yaml <<EOT
#cloud-config
otc:
   internalnet:
      - 172.16/12
   snat:
      masq:
         - INTERNALNET
   addip:
      eth0: 172.16.0.99
   autoupdate:
      frequency: daily
      categories: security recommended
EOT
IMGID=$(glance image-list | listid 'Standard_openSUSE_42_JeOS_latest')
nova boot --image $IMGID --flavor computev1-1 --key-name SSHkey-SNAT --user-data user_data.yaml --availability-zone eu-de-01 --security-groups $SNATSG --nic net-id=$SNATNET,v4-fixed-ip=172.16.0.4 SNAT-INST1
nova boot --image $IMGID --flavor computev1-1 --key-name SSHkey-SNAT --user-data user_data.yaml --availability-zone eu-de-02 --security-groups $SNATSG --nic net-id=$SNATNET,v4-fixed-ip=172.16.0.5 SNAT-INST2
SNAT_INST1_PORT=$(neutron port-list | grep 172.16.0.4 | listid $SNATSUB)
neutron port-update $SNAT_INST1_PORT --allowed-address-pairs type=dict list=true ip_address=0.0.0.0/1 ip_address=128.0.0.0/1
neutron floatingip-create --port-id $SNAT_INST1_PORT admin_external_net
SNAT_INST2_PORT=$(neutron port-list | grep 172.16.0.5 | listid $SNATSUB)
neutron port-update $SNAT_INST2_PORT --allowed-address-pairs type=dict list=true ip_address=0.0.0.0/1 ip_address=128.0.0.0/1
neutron floatingip-create --port-id $SNAT_INST2_PORT admin_external_net
neutron router-update VPC-ROUTER --routes type=dict list=true destination=0.0.0.0/0,nexthop=172.16.0.99
The above code assumes that your VPC Router carries the name
VPC-ROUTER, that a security group with suitable rules for the SNAT VMs
exists with the name SNAT-SG-DANGERZONE and that there is a ssh
keypair SSHkey-SNAT. It will masquerade outgoing traffic from the
172.16/12 range, so this assumes all the other subnets on the VPC
router, needing SNAT, use addresses in this address range. For
simplicity it also just uses fixed IPs, network resources have been
referenced by name (instead of their resource UUIDs), two little helper
functions are used and no error handling is done. Except for these
details, this is the recommended configuration.
Note the naming of SNAT-SG-DANGERZONE -- this security group does
contain ports that have --allowed-address-pairs set to the internet.
Thus do not allow packets from this security-group anywhere if you don't
want to open up to the world.
A complete code example can be found in config_snat.sh_.
Note that the otc.addip setting does not do a plain
ip addr add $VIP/32 dev $DEV on both instances. Though this appears to
work, it relies on the router ARP cache keeping the routing stable and
not alternate between the two instances without need. While this would
appear to work on our tests, this could not be guaranteed to always work
in the future; the otc.addip setting thus starts a service
(snat_addip.sh) that monitors availability of the internet
connectivity and the virtual IP address availability and ensure that
only one instance claims the virtual IP address. If one instance loses
connectivity, a failover takes place.
Routing via the SNAT instance
OTC 2.0 introduces a VPC-routing feature which allows outgoing traffic originating from ports without an EIP to be routed via the SNAT instance.
This can be set in the Web Interface; see the ch. 3.9 of the VPC user manual on the OTC documentation_.
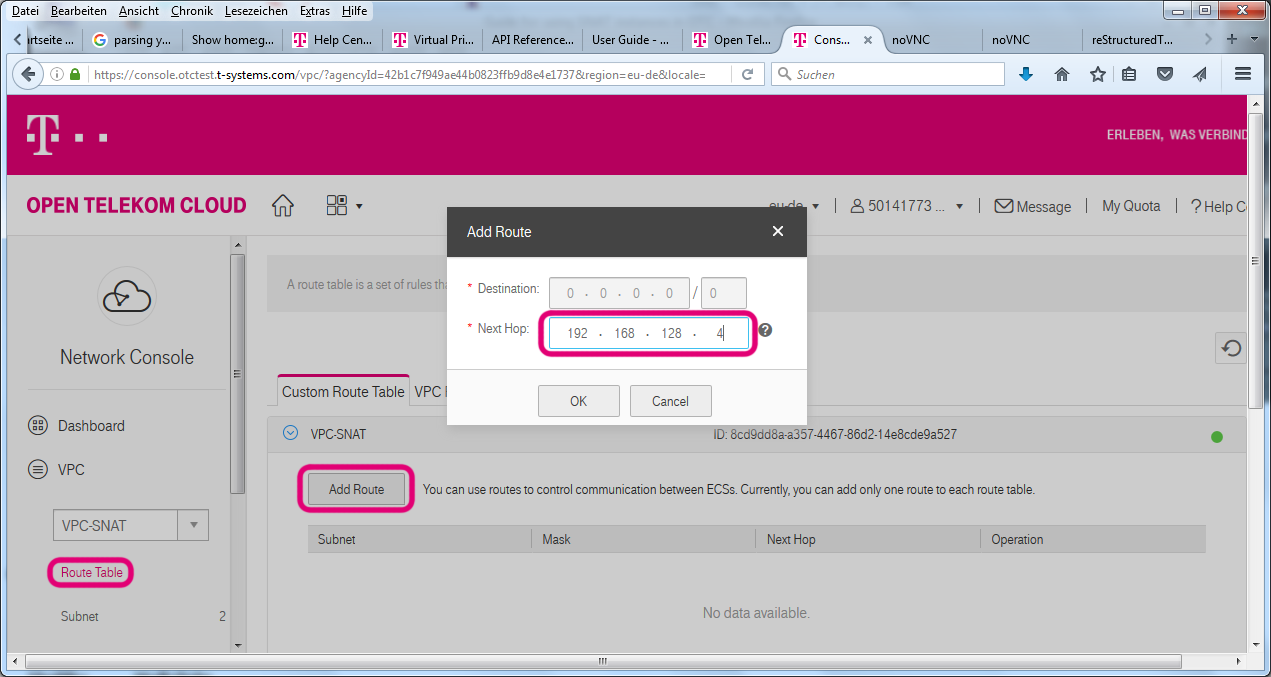
We have included the command to do this via API in the above code example already:
neutron router-update VPC-ROUTER --routes type=dict list=true destination=0.0.0.0/0,nexthop=172.16.0.99Using this VPC routing feature, no changes to any VM routing
configuration will be needed. VMs will talk to their neighbours (in the
same subnet) directly as before and use the VPC router as default
gateway for everything else. The router will still know all the
connected subnets (connected via neutron router-interface-add or via
WebInterface) as well as the peered VPCs, VPN connections and the
provider network (which hosts the public services such as DNS, NTP and
repository mirrors) and forward packets accordinglyly. And it will still
send packets directly to the internet from ports (vNICs) that have a
floating IP (EIP) associated. The VPC route configured for 0.0.0.0/0
has the lowest precendence and will only be used when none of the above
conditions are met, which is exactly what you want for providing an SNAT
service.
Currently, the users do not have the freedom to have more finegrained control over the routing table used on the VPC router. The setup with a default route however matches the common use cases; whether it is an SNAT instance that routes outgoing traffic to the internet or other use cases, such as an openVPN endpoint that connects remote networks.
Appendix
Setting routes directly to the SNAT gateway
Prior to OTC 2.0, there was no way to configure the VPC router to specify routing via an SNAT gateway. So to use an SNAT instance, you had to change the route table on all VMs that needed outbound Internet access without having their own EIP.
Assuming the SNAT gateway has IP 192.168.16.4 in a /22 network, the routing table could look like this:
Kernel IP routing table
Destination     Gateway         Genmask         Flags Metric Ref    Use Iface
default         192.168.16.4    0.0.0.0         UG    0      0        0 eth0
10.0.0.0        192.168.16.1    255.0.0.0       UG    0      0        0 eth0
100.64.0.0      192.168.16.1    255.192.0.0     UG    0      0        0 eth0
172.16.0.0      192.168.16.1    255.240.0.0     UG    0      0        0 eth0
192.168.0.0     192.168.16.1    255.255.0.0     UG    0      0        0 eth0
169.254.169.254 192.168.16.1    255.255.255.255 UGH   0      0        0 eth0
192.168.16.0    *               255.255.252.0   U     0      0        0 eth0
Note that packets to the local networks are all sent to the default gateway, while the rest are sent to the SNAT gateway.
This is a bit complex; for hosts in other subnets, you would need to configure a host route to the SNAT gateway via the VPC router (.1) before being able to add default routes via the SNAT instance. It's not practical to manage such route tables for a large number of hosts, unless you play DHCP tricks. If you want to go down that route, you would create ports (vNICs) and tweak them with extra_dhcp_options prior to booting VMs. Setting up your own DHCP server is possible, but even more troublesome, as your IPs are then no longer managed in OpenStack which creates challenges for allowed-address-pairs, security-groups and the simple ability to find out IPs for a VM.
Multi-Network card setups
In the preconfigured setup, we used only one vNIC for the SNAT instance; traditional network people would have used two interfaces, one for the internal connection and one that gets the EIP attached. As the IP address unbinding only needs to be done on the internal network interface, the security group protection towards the outside world would remain effective. Also, as most Linux distribution firewall scripts assume multiple interfaces for multiple zones, it would be easier to express correct filtering policies.
On the other hand, both vNIC's subnets would need to be connected to the
VPC router, so the network separation remains incomplete. For this
reason, the simple setup with one vNIC has been prepared using the
customer otc.snat user_data settings. The script could be extended
and tested to also support multi-vNIC setups, but this is not currently
the case. Talk to us if you have a need ...
Alternatives
As NTP and DNS and package mirrors are covered by services in the OTC
public service zone, the need for outgoing internet access might not be
that large. Rather than having a full-blown SNAT service, you could set
up an http/https or socks proxy server. Many applications do support the
http_proxy and HTTPS_PROXY environment variables and would use any
proxy configured this way. If sufficient interest is communicated to us,
we could provide an easy way to configure squid with a few lines of
user_data to provide such a service.